


Link - Rear Legs Control
- In stock, ready to ship
- Helps limit rear leg splaying in puppies with swimmer puppy syndrome
- Provides stability for dogs with neurological conditions affecting their back legs
- Supports safe healing after hip or pelvic surgery
- Assists with rehabilitation from muscle weakness to rebuild strength
- Gently controls leg movement during orthopedic recovery to prevent setbacks

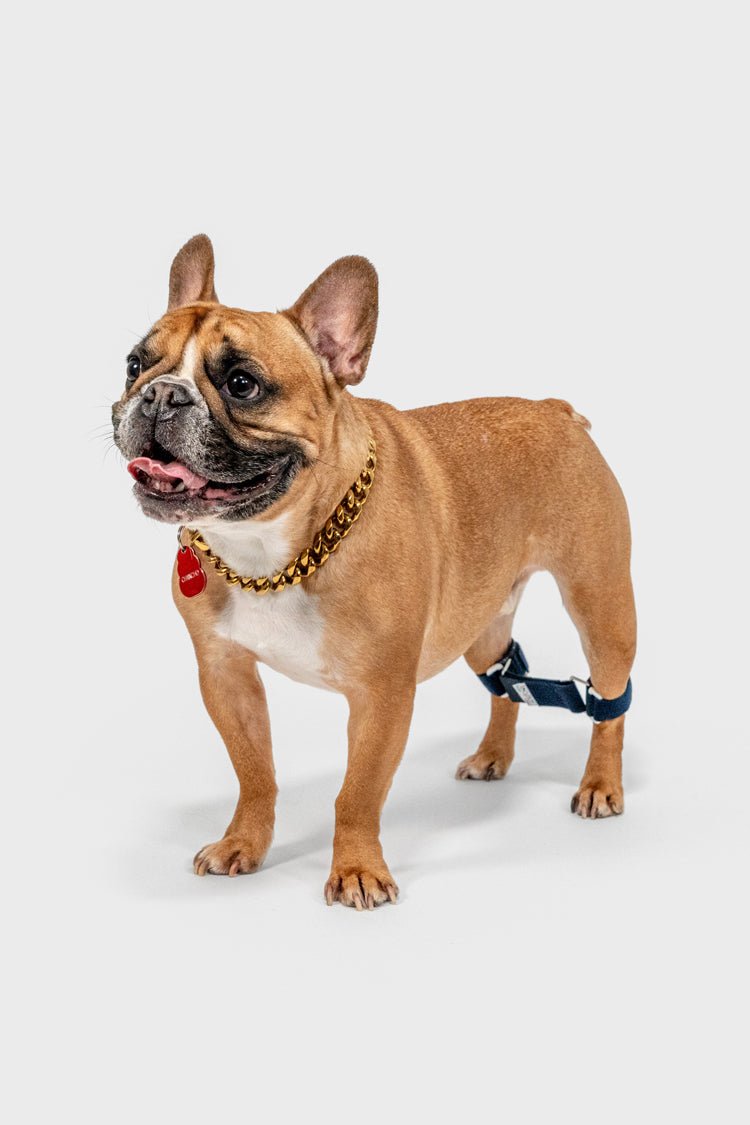
The Balto® Link Dog Splaying Brace is a veterinarian-approved solution designed to help dogs who struggle with excessive rear leg splaying. Acting as a gentle hobble system, the brace connects the hind legs to encourage proper alignment and stability, making it especially helpful for puppies with swimmer puppy syndrome, dogs with neurological conditions, or pets recovering from hip, pelvic, or femoral surgery.
Made from soft, breathable fabric infused with silver fibers, the Balto® Link provides antibacterial protection while ensuring comfort during wear. It’s fully adjustable for a secure yet non-restrictive fit, giving your dog the freedom to move naturally while staying safely supported. Lightweight and easy to hand wash, this brace is designed for everyday use during recovery or rehabilitation.
- Why pet parents choose the Balto® Link:
- Limits rear leg splaying to encourage a proper stance and controlled movement
- Supports dogs with neurological conditions affecting balance and coordination
- Aids post-surgical recovery after hip, pelvic, or femoral procedures
- Helps with muscle weakness rehabilitation, allowing dogs to rebuild strength
- Assists in physical therapy or structured rehab plans, promoting safe healing
Available in Small through XX-Large sizes, the Balto® Link is a trusted option for dogs of all ages and sizes (consult your veterinarian before use in dogs under 2 years old). By gently controlling hind leg movement, this brace improves stability, recovery, and overall quality of life; helping your dog stay active and comfortable.
| SIZE | WEIGHT |
|---|---|
| Small | 8.8 - 26.5lbs |
| Medium | 28.6 - 48.5 lbs |
| Large | 50.7 - 99 lbs |
| X-Large | 101.4 - 132.2 lbs |
| XX-Large | 132.3 - 220.5 lbs |
Step 1
Remove the central connecting strap.
Step 2
Open the first cuff and position it around the dog’s rear leg just above the hock joint.
Step 3
Make sure to pass the blue strap through the white plastic ring (do not thread it through the metal ring). Using both hands, fasten the cuff securely behind the leg.
Step 4
The fabric strap is adjustable to fit the leg’s shape and size. If needed, trim any excess material using scissors.
Step 5
Once the first cuff is secured, apply the second cuff to the other leg.
Step 6
Attach the central connecting strap to the metal rings, threading it in opposite directions (fig. 6a). Allowing for additional width adjustment.
- How do I prevent the brace from rotating?
- The brace must be securely fastened around the dogs legs. Try adjusting the distance apart to get a stable fit.
- How do I ensure the brace lasts a long time?
- Keep Velcro® clear of hair and dirt to ensure a strong stick.
- Can the Balto Link be used with other braces?
- This depends on the brace. It is not recommended to pair with knee braces, however it can be used alongside a hip or hock brace.
- Allow up to two weeks for your pet to fully accept the brace
- Wear the brace for 30 minutes a day, increasing 30 minutes each day after, for up to 12 hours
- Consult your veterinarian for specific instructions on when to wear your brace
- Remove the brace when your animal sleeps at night
- Inspect your pet for signs of skin irritation. If any are present, contact your veterinarian
- In addition to wiping the brace clean, keep skin and fur that comes into contact with the brace clean
- Inspect your brace regularly for any damage
A clean brace not only prevents infections, irritation, and a stinky smell; but it also allows your brace to last longer. To help support the longevity of your bracing device, here are some of our tips on how to properly clean your orthopedic bracing:
- Remove as much hair as possible from any Velcro® frequently to prevent compaction.
- Use lint roller or lightly adhesive tape to remove hair from the material of the brace.
- By hand, use warm water and a gentle cleansing soap to remove any stains and odors.
- Rinse soap thoroughly from the brace
- Hang to dry. Once the brace is completely dry, it is ready for use!